OpenVPN Configuration
OpenVPN is an easy to use, secure, open source VPN. The addition of OpenVPN Client support for iOS and Andriod mobile devices has led to new supported features in AstLinux. Features include a dual IPv4/IPv6 tunnel, TLS-Auth for added security, and client.ovpn file export to easily configure mobile devices and desktops.
Note: AstLinux 1.1.1 or later is required for dual IPv4/IPv6 tunnel, TLS-Auth, and client.ovpn export
OpenVPN Server Configuration
The AstLinux Web Interface is used for configuration, click on OpenVPN Configuration
Network tab → VPN Type:

The following OpenVPN Server Configuration is a good place to start. Only a couple entries are optional (as noted) and with a few changes for your local network you will have a working OpenVPN server.
Note -> Any option labeled with [client.ovpn] will be exported to the credentials client.ovpn file. This implies this setting must match all client tunnel settings, so any server configuration changes requires updating all the client tunnel configuration settings.
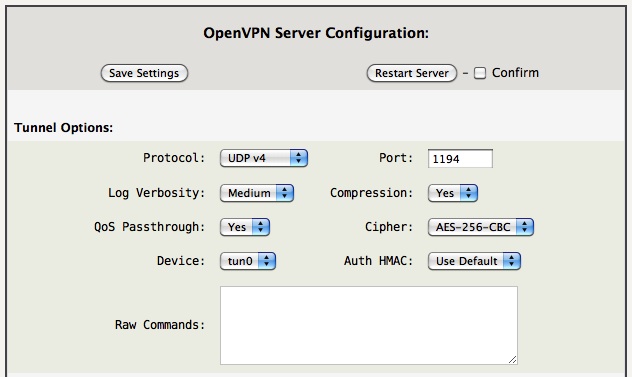
- Protocol: Specify which protocol the server listens on. [client.ovpn]
- UDP v4 - Listen using UDP and IPv4-only
- TCP v4 - Listen using TCP and IPv4-only
- UDP v4/v6 - Listen using UDP and both IPv4/IPv6, requires an IPv4/IPv6 system.
- TCP v4/v6 - Listen using TCP and both IPv4/IPv6, requires an IPv4/IPv6 system.
- Log Verbosity: Set the server logging verbosity level.
- QoS Passthrough: If “Yes”, set the TOS field of the tunnel packet to what the payload's TOS is.
- Device: Set the tunnel device, either
tun0ortun1. The defaulttun0is usually good.
- Port: Set the port number the server listens on, defaults to 1194. [client.ovpn]
- Compression: if “Yes” use fast LZO compression – may add up to 1 byte per packet for incompressible data. “Yes” is usually a good choice. [client.ovpn]
- Cipher: Encrypt packets with the selected cipher algorithm. When supporting mobile devices “AES-256-CBC” is a good choice since many mobile devices have hardware AES engines, which is more power efficient. [client.ovpn]
- Auth HMAC: Authenticate packets with HMAC using the selected message digest algorithm. The default “Use Default” is usually good, which is SHA1. [client.ovpn]
- Raw Commands: (advanced) Specify additional server specific OpenVPN commands, some example are:
client-config-dir /etc/openvpn/ccdclient-to-clientmultihomemute 20
Tip -> If you also want to route packets to client networks: OpenVPN Client Networks

- Auth Method: A certificate is always required, a user/pass may be added for extra security. With mobile clients, requiring a user/pass is good practice to quickly counter when a mobile device is lost or stolen. [client.ovpn]
- Certificate - Use TLS and certificates.
- Cert. + User/Pass - Use TLS and certificates in addition to a required user/pass.
- Extra TLS-Auth: Enable a kind of “HMAC firewall” on OpenVPN's TCP/UDP port, where TLS control channel packets bearing an incorrect HMAC signature can be dropped immediately without response. “Yes” is a good choice if all clients support it. [client.ovpn]

- External Hosts: Define a space separated list of allowed IPv4/IPv6 addresses via the external interface. The external firewall rules are automatically created by the openvpn-server plugin . The firewall must be enabled, see the “Enable Firewall” section below for more info.
- Client Isolation: Choose to “Pass” or “Deny” Client→Client traffic. “Deny” isolates connected clients, blocking access with each other. (AstLinux 1.3.5 and later)
Tip -> Allow any external IPv4/IPv6 address by defining “External Hosts:” to “0/0”.

- Server Hostname(s): Does not effect the OpenVPN server configuration, rather it is only used when downloading client credentials containing
client.ovpnfiles. It is used to define the hostname of the server from the client's point of view. This entry can be a DNS hostname, IPv4 or IPv6 manual address. AstLinux 1.2.1 and later this may contain a space separated list of hosts for failover. [client.ovpn]
- Network IPv4 NM: Define an IPv4 address and NetMask, space separated, which configures the server tunnel device
tun0network.
- Network IPv6/nn: (optional) Only define if you have an IPv4/IPv6 system and want to push IPv6 addresses to clients. Specify an IPv6 network block under your control. (Don't use the example IPv6/nn value shown.)
Tip -> If the optional “Network IPv6/nn:” field is defined, the “push” command of “route-ipv6 2000::/3” will route all Global IPv6 over the tunnel.
- Topology: Define the method the tunnel addresses are formulated, the value is “pushed” to the client. Choose “subnet” if all your clients support it.
- net30 - Use a point-to-point topology, by allocating one /30 subnet per client. This is designed to allow point-to-point semantics when some or all of the connecting clients might be Windows systems. This is the default on OpenVPN 2.0.
- p2p - Use a point-to-point topology where the remote endpoint of the client's tun interface always points to the local endpoint of the server's tun interface. This mode allocates a single IP address per connecting client. Only use when none of the connecting clients are Windows systems.
- subnet - Use a subnet rather than a point-to-point topology by configuring the tun interface with a local IP address and subnet mask. This mode allocates a single IP address per connecting client and works on Windows as well. Only available when server and clients are OpenVPN 2.1 or higher. When used on Windows, requires version 8.2 or higher of the TAP-Win32 driver.
- “push”: Push a config option back to the client for remote execution. Most all configurations will require either a
routeorredirect-gatewayto push remote routes via the tunnel. Some examples:dhcp-option DOMAIN example.comdhcp-option DNS 10.10.10.1route 10.10.10.0 255.255.255.0route-ipv6 2000::/3redirect-gateway def1

- Private Key Size: Select the key length, most suggest using 2048 Bits. This selection only applies to future created keys.
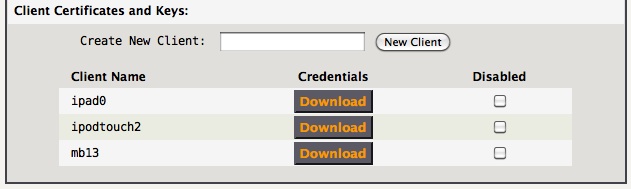
Create new clients, then download their credentials. Keep it secure!
Note -> Create unique credentials for each client! If 2 different clients connect with the same credentials at the same time, the second client will log out the first one, then the first one will be re-connecting automatically and again logging out the second, and so on  .
.
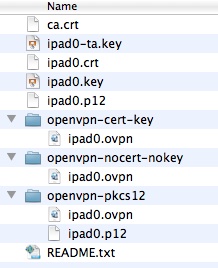
openvpn-cert-key, openvpn-nocert-nokey or openvpn-pkcs12
The client private key (client.key) must be kept secure. It is very convenient to use the openvpn-cert-key format where all the tunnel options, certificates and keys are stored, unencrypted, in one file. While very convenient, it is crucial that this file be handled in such a way that no third party can gain access to the file while transporting it to your client device. The openvpn-cert-key format is universally understood and should work with most any client, be it mobile or desktop.
For OpenVPN Connect App clients, the openvpn-nocert-nokey format removes the client certificate and private key, allowing it to be used together with the encrypted client.p12 file containing the removed entries. The client.p12 file can be transferred via an insecure transport, like email, provided the “PKCS#12 Container Password” from README.txt is kept secure. While this takes an extra step, it may provide an element of security for the client private key.
For OpenVPN desktop clients, the openvpn-pkcs12 format requires a pair of files in the same directory, the client.ovpn and client.p12 files. This method keeps the client credentials encrypted on the file system, the “PKCS#12 Container Password” from README.txt must either be provided manually each time when connecting or some clients allow the password to be stored in the operating system's keychain to automate the process.
Tip -> Some client devices may store the client.p12 file more securely, and conveniently if the “PKCS#12 Container Password” is kept in the keychain.
The choice of using the openvpn-cert-key, openvpn-nocert-nokey or openvpn-pkcs12 format depends on the the client device and how it is accessed.
Enable Firewall
The firewall must be enabled for the OpenVPN server to operate properly. The OpenVPN server device tun0 is treated as a LAN internal interface, which by default is isolated from all other LAN internal interfaces, but does by default have full access to the AstLinux box itself. The firewall can be configured to allow the OpenVPN server tunnel to pass packets to any one of the configured physical LAN interfaces.
Network tab → Firewall Configuration:

Click on Firewall Configuration

Additionally, the OpenVPN server tunnel is NAT'ed via the external interface, such that if an exiting IPv4 tunnel packet is routed out through the external interface it will have a NAT'ed path back into the tunnel.
Apple iOS Client Configuration
OpenVPN Client for iOS: OpenVPN Connect (Free)
![]()
A simple and secure method to transfer OpenVPN credentials to your iOS device is via Apple's iTunes and a USB cable. While this does not involve syncing per se, your iTunes must be be authenticated with the same Apple ID as your iOS device. iOS File Sharing
First, install the iOS OpenVPN Connect App on your iOS device.
Connect your iOS device to your desktop computer via USB, launch iTunes on your desktop, select your iOS device (varies by version of iTunes), finally click on the “Apps” tab. If you have never connected your iOS device to the desktop computer before, you may have to do some things to make iTunes happy.

Scroll down to the “File Sharing” section, click on the OpenVPN App icon. The OpenVPN Documents section will be shown.
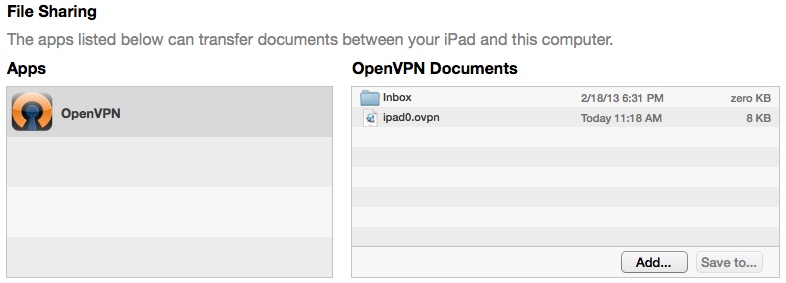
Next either use the “Add…” button to include the ipad0.ovpn file or simply drag the openvpn-cert-key ipad0.ovpn file to the OpenVPN Documents section.
Tip -> You can delete a file from the OpenVPN Documents by selecting the file and hitting the Delete key.
The ipad0.ovpn file is now on the iOS device.
Tip -> If you choose to use the openvpn-nocert-nokey format for ipad0.ovpn, you must also email the ipad0.p12 file to your device and install it using the “PKCS#12 Container Password” found in README.txt .
You now may want to unmount the iOS device within iTunes and exit iTunes, remove the USB cable.
On your iOS device, launch the OpenVPN app and you should see the following:

The “Standard profile” description implies you imported the openvpn-cert-key format.
Tap the big green + and you should be ready to connect to your OpenVPN server.
Android Client Configuration
OpenVPN Client for Android: OpenVPN Connect (Free)
![]()
Apple macOS Client Configuration
OpenVPN Client for macOS: Viscosity (Free for 30 days)
![]()
Select Viscosity's Preferences window:


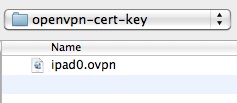
Select the openvpn-cert-key (or openvpn-pkcs12) ipad0.ovpn credentials.
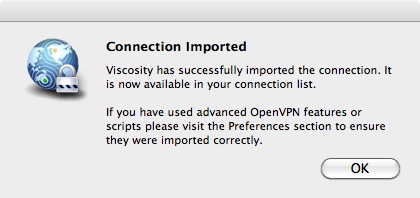
The above dialog explains it well.
You should be able to connect to the OpenVPN server.
OpenVPN Client for macOS: Tunnelblick (Free)
![]()
Ref: See Tunnelblick link for installation instructions.
Windows Client Configuration
OpenVPN Client for Windows: Viscosity (Free for 30 days)
![]()
Ref: See Apple macOS instructions for Viscosity.
OpenVPN Client for Windows: Windows Installer/GUI (Free)
![]()
The OpenVPN folks offer a free Windows Installer and GUI for the OpenVPN package.
Using the above link download the “Windows Installer”. This example uses Windows7. Download the latest version, and install using the default selections.
Next, download your credentials from the AstLinux OpenVPN server page, unzip the package, and using the openvpn-cert-key format client.ovpn file, place the (win7.ovpn in this example) file into the following folder:
C:\Users\<USER>\OpenVPN\config\
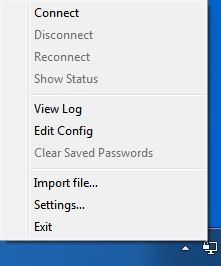
Or more simply, find the OpenVPN task in the system tray, right-click on it, select “Import file…” and select your named openvpn-cert-key format client.ovpn file.

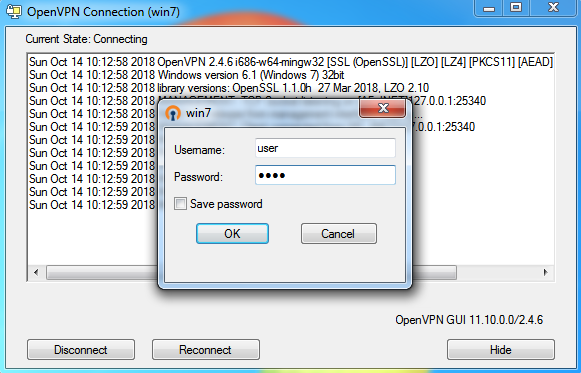
Next, you are ready to connect to your OpenVPN server, right-click on the OpenVPN task in the system tray:
Finally, select “Connect” and a connection window will appear, then disappear when the connection is established.
Tip -> If it takes very long for the Windows client to establish a connection to the OpenVPN server (more than 10 sec.), you can try to manually add this to the client config file:
proto udp4
This way OpenVPN tries to use IPv4 first.