Fossil - Software Configuration Management
AstLinux now supports the Fossil package, a simple, high-reliability, distributed software configuration management system.
Code developers have long known the importance of tracking changes by file and timeline using a version control system (VCS). Managing software configurations, particularly for complex packages such as Asterisk, and even the AstLinux system itself can greatly benefit from the same sort of tools. Fossil is implemented as a single executable binary, and in AstLinux's case uses a single SQLite database file as the repository, which can track directories and files containing text configurations. Even changes using the web interface changes a directory full of text files, these changes can be tracked in a timeline using Fossil.
Additionally, Fossil has a built-in and intuitive web interface with a rich assortment of information pages, also including bug tracking, wiki, and technotes.
Credit the Open Source packages SQLite and Fossil beginnings to D. Richard Hipp (SQLite discussion at 7 min, Fossil at 14 min).
Note: AstLinux 1.2.4.1 or later is required
Fossil Configuration
Select the Network Tab in the web interface.


Note -> Both “Include Dirs” and “Include Files” entries are relative to: /mnt/kd/
Tip -> “Include Files” may include the * wildcard, such as *.conf . Space separate multiple entries.
By default, even with “Include Dirs” and “Include Files” empty, a standard default set of configuration dirs and files will be used. Use the include entries to add additional directories and files.
Note -> Be aware that including a directory will include that directory's files and any sub-directories and files.
The configuration is autogenerated. You just need to enable Fossil Server. The resulting respository database file will be located at: /mnt/kd/fossil/astlinux.fossil
Once Fossil has been enabled and restarted, continue with the Fossil Web Interface, below.
Tip -> If you want to automatically track daily file changes, use cron and “fossil-commit” See Below: AstLinux Fossil Command Scripts
Fossil Web Interface
By default the Fossil tab is not shown, enable it via the Prefs tab…

The “Fossil Web Interface” may be explored by using the Fossil tab:


Tip -> If you prefer to view the “Fossil Web Interface” in a separate browser window, ex. for host “pbx” use URL:
https://pbx/admin/fossil/
By default, since the Fossil tab user has been authenticated as an 'admin' user in the AstLinux web interface, the Fossil “nobody” user defaults to “admin” permissions. One level higher permissions is the Fossil “admin” user which has “setup/super-user” permissions with the default password of “astlinux”. Feel free to change that password, preferably different from the system root password and AstLinux web interface admin password.
Change the Fossil admin password by first clicking on the 'Login' link and login with the default credentials, then change the password by clicking on the 'Logout' link or Admin → Users → admin link.
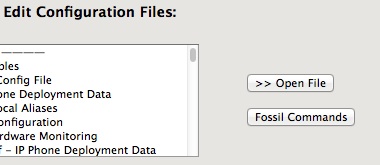
Additionally, while editing files, also referred to the “current checkout” in version control lingo, you can access a “Fossil Commands” sub-tab via the Edit tab.

Tip -> The “Fossil Commands” button is only shown if the “Show Fossil Tab” Prefs entry is checked.
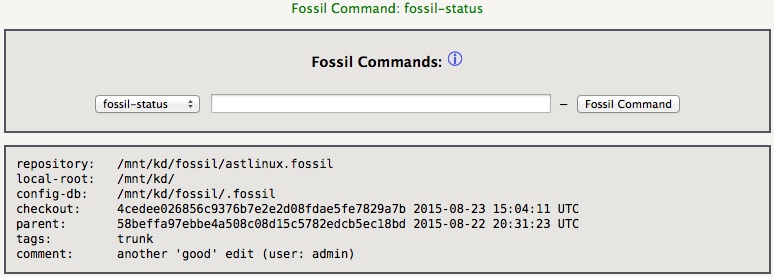
Click on the “Fossil Commands” button and you will see the display below after clicking the “Fossil Command” button with “fossil-status” selected.

The drop-down menu allows the user to select the various AstLinux Fossil Command Scripts that can be executed. You may click on the small (i) topic icon to display more information for each available command. The Fossil Command Scripts are also described below.
Note -> The internal timestamps are stored in UTC time, but in the Fossil Web Interface are displayed (usually) in your local time.
AstLinux Fossil Command Scripts
AstLinux includes several “helper” scripts for Fossil. These scripts automatically set the base directory and open and close using a standard repository file.
Using these scripts, even without any previous experience using version control systems, the user will find it easy edit, add and delete files and commit those changes to the Fossil repository for timeline tracking.
Note -> With respect to Fossil, all these scripts specify the “local-root” or base directory to: /mnt/kd/
The “fossil-status” command:
Usage: fossil-status
This command reports on the status of the current checkout (your edited files) compared to the last commit to the repository.
The “fossil-diff” command:
Usage: fossil-diff [options] [FILE1 FILE2 ...]
This command shows the difference between the current checkout (your edited files) compared to the last commit to the repository. Without any arguments fossil-diff shows all the differences of all the edited files.
See options via the CLI by:
fossil help diff
Surely you have been in this situation, actively editing configuration files, got interrupted, and when you resume editing you first want to know “Where was I ?”. The “fossil-diff” command is a tool you will greatly appreciate.
The “fossil-commit” command:
Usage: fossil-commit [comment-text]
This command creates a new revision containing all of the changes in the current checkout (your edited files).
If no comment-text is provided, “auto commit via cron” will be used.
All files that have changed will be committed, including added and removed files.
Tip -> If you want to automatically track daily file changes and auto-commit those changes, you can un-comment the existing cron entry as follows:
##
## Fossil daily auto-commit - Do not remove, un-comment to enable
55 23 * * * /usr/bin/fossil-commit >/dev/null 2>&1
The nice thing is, when nothing has changed, no commit will actually be generated. Keep in mind that even with a daily auto-commit running in the background, changes can still be manually committed with an informative comment-text message whenever desired. Also the auto-commit comment can be edited later, when you select the commit, and then click 'Edit' (within 'Other Links') at the top section.
The “fossil-revert” command:
Usage: fossil-revert [/mnt/kd/]FILE [hex_revision_num]
This command reverts to the current repository version of FILE, or to the version associated with baseline hex_revision_num.
In other words, if you edited asterisk/extensions.conf and realized you made a mistake, looking at the fossil-diff asterisk/extensions.conf changes all look wrong, you can revert to the latest revision with: fossil-revert asterisk/extensions.conf
Continuing with that example, if you already committed asterisk/extensions.conf, you can revert to a previous revision by specifying the hex_revision_num of the last correct Check-In. You only need to specify the first few hex digits of the revision number that make it unique.
The “fossil-open” command:
Usage: fossil-open
Warning -> Only users that understand the native fossil command should use the fossil-open command.
The fossil-open command is to allow access to the native fossil command-set using the standard repository.
For example:
cd /mnt/kd/
fossil-open
fossil timeline
fossil-close
Note that you must have your current working directory set somewhere in the /mnt/kd/ tree for some of the native fossil commands to work.
Note -> After the native fossil command session is completed, be certain to finish with the fossil-close command, or alternatively the native “fossil close” command.
The “fossil-close” command:
Usage: fossil-close
This command closes a native fossil command session initiated by the fossil-open command.
Fossil Command Line Interface
Most users will not need to access the native fossil command-set, use the AstLinux Fossil Command Scripts mentioned above instead.
You have been warned, but if you have the skills, the native fossil command-set can be displayed with:
fossil help
And more specific help by command (eg. diff):
fossil help diff
Additionally at the Command-Line Help on the Fossil website.
Reset Fossil Repository
The Fossil repository is stored in a single SQLite database file at: /mnt/kd/fossil/astlinux.fossil
If for any reason you want to reset an existing repository to a clean new default state, you can do the following via the CLI:
service fossil stop

mv /mnt/kd/fossil/astlinux.fossil /mnt/kd/fossil/astlinux.fossil.save

service fossil init
Following that a new, default repository is generated.
Additionally, if you want to control what default directories and files that are used by Fossil, the system variables FOSSIL_DEFAULT_DIRS and FOSSIL_DEFAULT_FILES can be defined before resetting the repository. For example:
FOSSIL_DEFAULT_DIRS="rc.conf.d asterisk"
FOSSIL_DEFAULT_FILES="*.conf"
would only include the directories and files defined, plus any “Include Dirs” and “Include Files” in the Network tab.
Fossil Tweaks
In the “Fossil Web Interface” if you want to display 'Check-ins' by default on the 'Timeline' button (instead of 'Any Type'), then you need to edit the 'Header' section under the 'Admin/Skins' menu, and add “?y=ci” to the URL for the 'Timeline' button on the menu bar:
Change:
menulink $index_page Home
if {[anycap jor]} {
  menulink /timeline Timeline
to:
menulink $index_page Home
if {[anycap jor]} {
  menulink /timeline?y=ci Timeline