New Installation
After over 21 years (2026-03-01), AstLinux is considered deprecated. New AstLinux installations are no longer recommended.
Starting with AstLinux 1.2.5 installation images are now contained within an ISO Installer Image (astlinux-xxx-board.iso) for each board type.
Since AstLinux 1.3.10 only 64-bit installations are supported.
The ISO image can be used in several ways:
- Write the ISO Installer image to a USB flash drive (
ddimage mode), then boot using the USB drive and install to an internal disk. - Boot the ISO Installer image (ISO CDROM) within a Virtual Machine and install to a virtual disk.
- Mount the ISO Installer image and manually extract the desired .img.gz file from the “os” directory,
gunzipandddto a destination disk. - (UEFI only) Mount the ISO Installer image and manually, recursively copy all files to a FAT32/Master-Boot-Record USB drive.
Typical New Installation:
- Download the appropriate astlinux-xxx-board.iso image from the AstLinux website. 1)
Links to ISO installers for older hardware can be found here. - Transfer the ISO image to a USB flash drive:
- On Linux or *BSD use
ddto transfer the image, where sdX is your USB flash drive
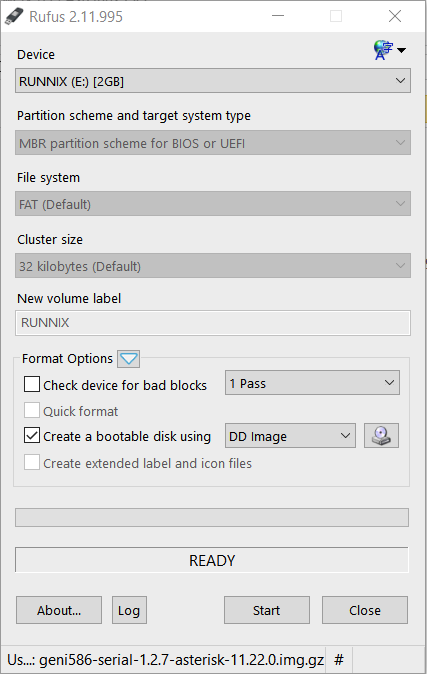
$ dd if=astlinux-xxx-board.iso of=/dev/sdX - On Windows boxes, use Rufus (Write in “DD Image” mode). Rufus can also write
*.img.gzimages.
Note: Rufus 3.17.1846 has a security issue, should be fixed in 3.18. - On macOS boxes, use os-x-cf-write.
- On Chrome OS boxes, use chromeos-ssd-write.
- (UEFI only) Copy the ISO Installer image contents to a FAT32/Master-Boot-Record USB drive, macOS example:
$ cp -a /Volumes/ASTLINUX_ISO/* /Volumes/ASTLINUXFAT/
- Boot using the USB flash drive, follow the menu to install to an internal disk.
- Note -> Serial console ISO images (-serial.iso) use serial settings of
19200n8.
- Shutdown, remove the USB flash drive and boot your new AstLinux system.
- Continue with the setup instructions below…
- Required -> Security and Sound Files
- Optional -> Optional Hardware Tweaks
Persistent Storage Options (GUI)
AstLinux requires persistent storage, that file storage is of two classifications:
- System overlay data (Unionfs), such as passwords, startup modules and other changes to the root system.
- Configuration data (/mnt/kd/), such as the Asterisk configuration files, system settings and voicemail messages.
Using a computer on the same network, open your favorite web browser and type the following…
https://pbx.local/admin/setup.php
Tip -> Replace “pbx.local” with the IP address of your box if zero-configuration Bonjour is not supported in your browser.
Tip -> Be sure that you use https (http will NOT work).
You will be prompted to login. The default user is admin with a password of astlinux

Now you will see the following screen:

Here you can choose how you want to format your persistent storage. The drop-down box shows the proposed installation device. Read the instructions carefully and follow what it says.
Then click Continue, the screen below will be displayed.

The “System is Rebooting…” will disappear when the reboot is complete, then click Finish, after a short delay the system will reboot once again.
Note -> Since reboot times can vary, your browser may fail to automatically reload, don't worry, wait a minute and manually reload your browser to continue.
Normally you will not see the screen below, your browser should be redirected to the Status page, but if you reload the browser to /admin/setup.php after a successful installation, you will see the screen below. If so, click Continue, to view the Status page.

You can confirm that the setup was successful by accessing the default status page:
https://pbx.local
Tip -> Replace “pbx.local” with the IP address of your box if zero-configuration Bonjour is not supported in your browser.
You will get the following screen. (This is only part of the full screen.)

- The /dev/sda1 partition is your original FAT16 data created by installing the astlinux-XXX.img via the ISO.
- The /dev/sda2 partition is the Unionfs partition, a R/W overlay for
/etcand/stat. - The /dev/sda3 partition is for
/mnt/kd/, essentially all your configuration data.
Skip to Security and Sound Files when completed.
Persistent Storage Options (CLI)
The same procedure as above can also be done on the command line, e.g. when your NIC isn't working right from the start (/dev/sda is an example, it can be different on your box):
$ initial-setup status
ok-format /dev/sda

$ initial-setup format separate /dev/sda 256

$ reboot

$ initial-setup configure /dev/sda

$ reboot
Security and Sound Files
Using the web interface, click on the System Tab

and change the “admin” password.

after which you will be asked to login with your new password.
Continue in the System tab to the Asterisk Sounds Packages section.

Select the package values (ex. core-english-ulaw), then select the action (ex. Upgrade/Install), then click on the Sounds Package button to perform the action. Usually a 'core' and 'moh' sound package using your native codec is all that is necessary, or at least a good start.
Tip -> The default “Sounds Pkg URL” currently supports English, Spanish and French. But you can set a different “Sounds Pkg URL” in the Prefs Tab at “System & Staff Tab Options” to install other (or your own) sounds.
Optional Hardware Tweaks
While the AstLinux project is not in the business of recommending x86 hardware, we do occasionally privately purchase or have hardware donated to test with the AstLinux platform.
When focusing on a specific x86 board or appliance, often useful configurations and tweaks can be performed to optimize the hardware for use with AstLinux. The link below will take you to a list of tested hardware with configuration recommendations and photos.
Specific Tested Hardware: Generic 64-bit, x86_64 Boards and Appliances
Tip -> Even if your exact hardware is not in the list, if you find a listing with a matching processor and chipset it may still be useful.