IP Phone Provisioning Getting Started
The process of coordinating the provisioning of SIP phones and the Asterisk configuration can be a tedious and time consuming process. Fortunately AstLinux provides tools to simplify that process.
Experienced users may skip to the detailed documentation found here: IP Phone Mass Deployment
First time users will find this quick overview helpful. It's easier than you might think !
Note: AstLinux 1.1.6 or later is required
Install Default Templates
Before we begin, the administrator must install “templates” before the PhoneProv tab can be used. AstLinux comes with a default set of templates that can be installed as follows to the default template location: /mnt/kd/phoneprov/templates/
mkdir -p /mnt/kd/phoneprov/templates

cp /stat/etc/phoneprov/templates/* /mnt/kd/phoneprov/templates/
That's it !
Understand that in almost all cases the default templates will need to be customized for your particular application, but for the moment we will utilize the defaults.
Getting Started How-To (GUI)
As a simple example, assume we have a SNOM 320 phone with a MAC address of 00:04:13:12:aa:ff. We want the phone to appear as extension 100 in Asterisk with Caller ID of “Test Phone”.
First enable “Show PhoneProv Tab” in the Prefs Tab.
Next, select the PhoneProv Tab in the web interface.

You will be shown an empty database…

Next, proceed by clicking in the “MAC Address:” field and enter the data as below:
Tip -> If the “Password:” field is left empty, a pseudo-random password of length 16 characters will be automatically generated.
Tip -> If the “Account:” field is left empty, a unique value will be created later using template “auto_account_…” formats.

Click “Save Settings” or Return/Enter from a text field to add the entry to the database. Notice how any spaces in the CID Name are mapped to underscores (mapped back to spaces later) and the password is auto-generated.

Click “Generate Files” to use the template definition to create the three (for this template) output files.

The resulting files are…
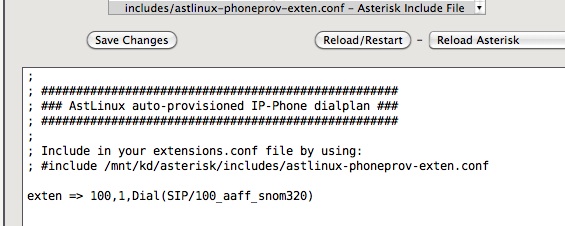
Dialplan File: /mnt/kd/asterisk/includes/astlinux-phoneprov-exten.conf
View using the Edit Tab…

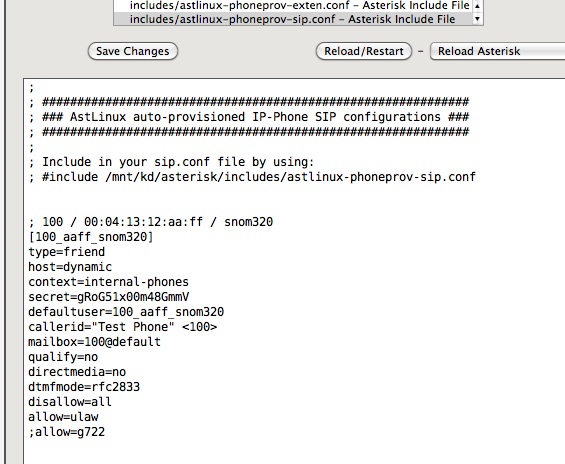
SIP File: /mnt/kd/asterisk/includes/astlinux-phoneprov-sip.conf
View using the Edit Tab…

SNOM provisioning file: /mnt/kd/phoneprov/snom/snom320-00041312AAFF.htm
View using the command line…
<?xml version="1.0" encoding="utf-8"?>
<settings>
<phone-settings>
<user_realname idx="1" perm="">100</user_realname>
<user_name idx="1" perm="">100_aaff_snom320</user_name>
<user_pname idx="1" perm="">100_aaff_snom320</user_pname>
<user_pass idx="1" perm="">gRoG51x00m48GmmV</user_pass>
<user_host idx="1" perm="">192.168.101.1</user_host>
<user_outbound idx="1" perm="">192.168.101.1</user_outbound>
<user_server_type idx="1" perm="">asterisk</user_server_type>
<phone_name perm="">snom-100</phone_name>
</phone-settings>
</settings>
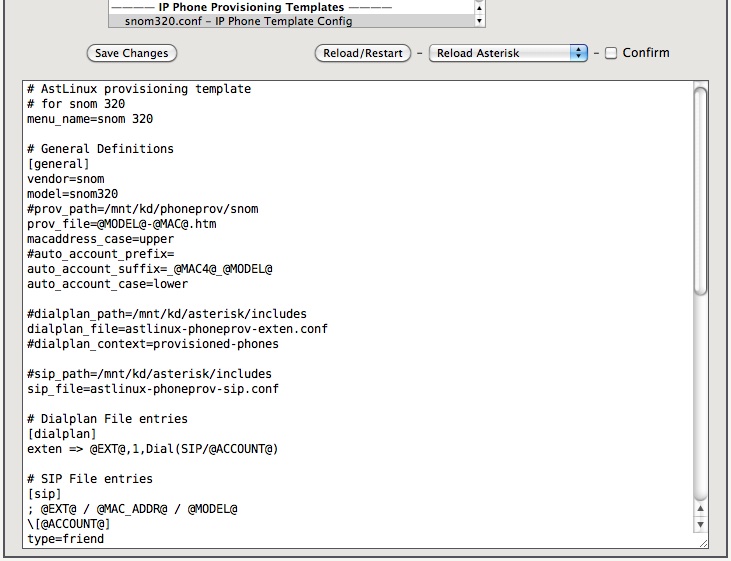
Finally, put your thinking cap on, and take a look at the snom320.conf template file. Try to follow how the above three files got created, and named as they did. Note that multiple extensions will be added to the same dialplan and sip files, but every MAC address will have it's own unique provisioning file.
For the template syntax, more info: Phone Template Syntax

In summary, it's easier than you might think !
Note -> Understand that these are just files at this point and does not effect your existing configuration. To “activate” these files you must “#include” the Asterisk files into their respective primary configuration files and enable the provisioning file to be served to your phone.
To understand this topic in more detail proceed to: IP Phone Mass Deployment