EdgeRouter-X VPN Endpoint
AstLinux supports many different x86 (32-bit and 64-bit) hardware devices, so when a remote VPN endpoint is desired in your AstLinux constellation it makes sense to first consider yet another AstLinux solution. Quite often AstLinux is the best solution … familiarity, full-system firmware upgrades, and if true, you can quit reading any further.
As an alternative for a remote VPN endpoint, the Ubiquiti Networks EdgeRouter-X occupies a special sweet-spot of quality hardware and low price (currently, January 2019). While similarly priced to a Raspberry Pi complete system, the EdgeRouter-X has quality hardware designed for networking, including a built-in 5-port Gbit ethernet switch. Additionally, the EdgeRouter-X is less-than-half the cost of the least expensive multi-NIC x86 system required to run AstLinux.

Since the EdgeRouter-X is not x86 hardware, AstLinux will not run on it. The default EdgeRouter-X firmware is EdgeOS, documentation found here: EdgeOS User Guide. The WireGuard VPN is currently available for EdgeOS as a third-party wireguard-e50-<revision>.deb package found here: vyatta-wireguard.
Alternatively, the OpenWrt Project offers firmware specifically built for the EdgeRouter-X with impressive performance. The current standard 18.06.1 release performs NAT routing at near 1 Gbps line speed, and WireGuard VPN performance at around 180 Mbps. Quite reasonable for a 32-bit, 880 MHz CPU.
It could be said that the EdgeRouter-X with OpenWrt and the WireGuard VPN in the kernel is an ideal solution for a remote VPN endpoint. The rest of this documentation describes how to install the current release of OpenWrt 18.06.1 on a Ubiquiti Networks EdgeRouter-X (ER-X).
Flash ER-X with OpenWrt using AstLinux
It is assumed an AstLinux box is available for serving the OpenWrt firmware images.
Tip -> AstLinux is not required here, you could use macOS, Linux, or even Windows to do the same, but using AstLinux makes sense as you probably have one laying around and are familiar with it.
Also required is a “USB-to-TTL Serial Cable” commonly used with development boards like the Raspberry Pi, BeagleBone Black, Arduino, etc. Search Amazon for “usb serial ttl”. A FTDI chipset is preferred, but a Prolific-PL2303 should also work. You also want the individual pins to be separate not molded together.
It is assumed the 1st LAN network of AstLinux is 192.168.101.1/24, adjust accordingly below if yours is different.
Do not connect power to the ER-X, yet.
Connect the ER-X eth0 port to the AstLinux LAN 192.168.101.1/24 network (yellow cable).
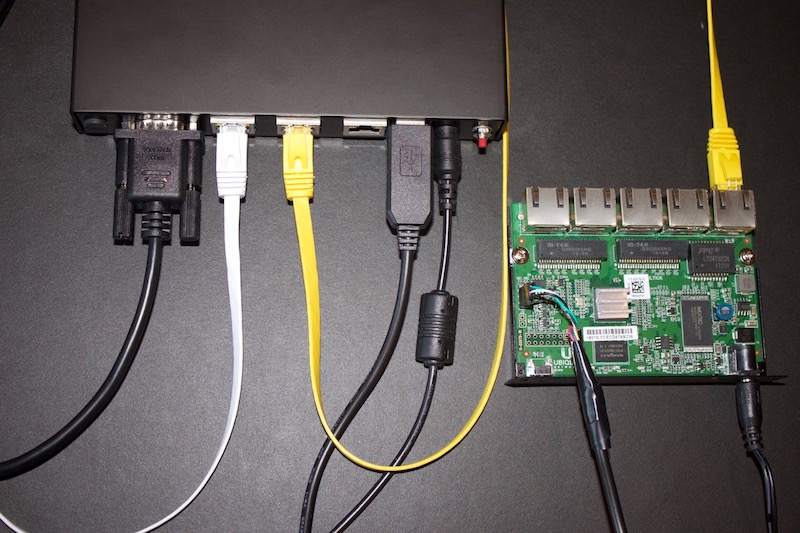
Carefully connect the TX, RX and GND pins to the ER-X as shown below. Do not connect to the +3.3V pin on the ER-X.
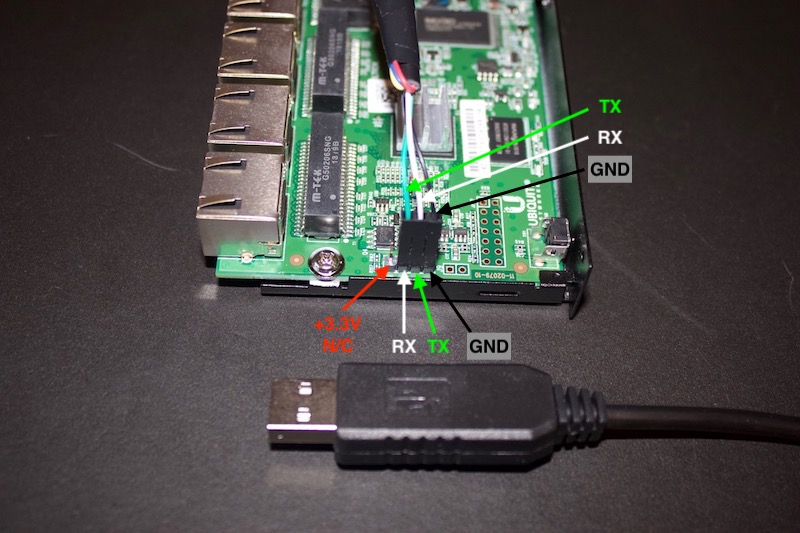
Connect the “USB-to-TTL Serial Cable” to a USB port on AstLinux.
Next, SSH into AstLinux:
Note -> If the directory /mnt/kd/phoneprov does not exist, you need to create it and re-init lighttpd. Only if /mnt/kd/phoneprov does not exist, perform:
mkdir /mnt/kd/phoneprov
service lighttpd stop
service lighttpd init
With /mnt/kd/phoneprov available, issue the following commands to download two OpenWrt flash images:
curl -o /mnt/kd/tftpboot/openwrt.bin 'https://downloads.openwrt.org/releases/18.06.1/targets/ramips/mt7621/openwrt-18.06.1-ramips-mt7621-ubnt-erx-initramfs-kernel.bin'

curl -o /mnt/kd/phoneprov/sysupgrade.tar 'https://downloads.openwrt.org/releases/18.06.1/targets/ramips/mt7621/openwrt-18.06.1-ramips-mt7621-ubnt-erx-squashfs-sysupgrade.tar'
Now connect to the ER-X serial console by issuing the command:
screen /dev/ttyUSB0 57600
Next, connect power to the ER-X and within a few seconds you must type 1 at the prompt shown below:
Tip -> if you are too slow and missed the prompt, power down the ER-X and try again.
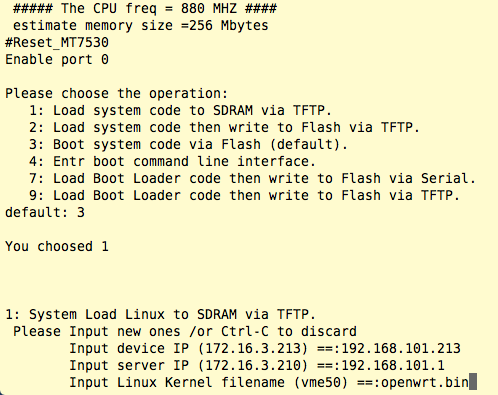
With the “System Load Linux to SDRAM via TFTP” chosen, you need to specify two IP addresses and the name of the TFTP filename openwrt.bin, as show above.
Note -> Some OpenWRT devices work exclusively with 192.168.1.1 + 192.168.1.2 as the device + server IP addresses! 1)
Type RETURN and the ER-X should reboot into the factory initramfs-kernel of OpenWrt. After the dmesg logs appear to stop, type RETURN again, you should see a login as shown below:
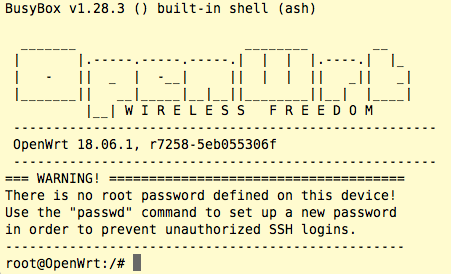
The factory initramfs-kernel image does not have the “overlayfs” filesystem, so we will upgrade to that. Issue the following commands:

Note -> The sysupgrade -n option is important!
Now after it reboots it has the “overlayfs” filesystem for persistent storage.
After the dmesg logs appear to stop, type RETURN yet again, set a root password and poweroff…
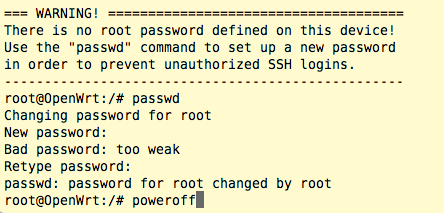
Finally, quit the screen serial console by typing: Control-A Control-\
Initial Setup of OpenWrt on ER-X
Your ER-X is now flashed with OpenWrt with persistent storage and a default configuration.
The WAN is the eth0 NIC and the LAN is the other NIC's (1-4) bridged together.
The WAN is set for DHCP client, and the LAN offers DHCP server on 192.168.1.1/24.
Attach the WAN so the internet is reachable, use a LAN device to ssh root@192.168.1.1 …
With the WAN connected, you can update packages from the command line over SSH:
root@OpenWrt:~# opkg update
Install HTTPS web interface:
root@OpenWrt:~# opkg install luci-ssl
root@OpenWrt:~# /etc/init.d/uhttpd restart
Install WireGuard:
root@OpenWrt:~# opkg install wireguard
root@OpenWrt:~# opkg install luci-app-wireguard
Now you can reach the HTTPS web interface via the LAN using https://192.168.1.1
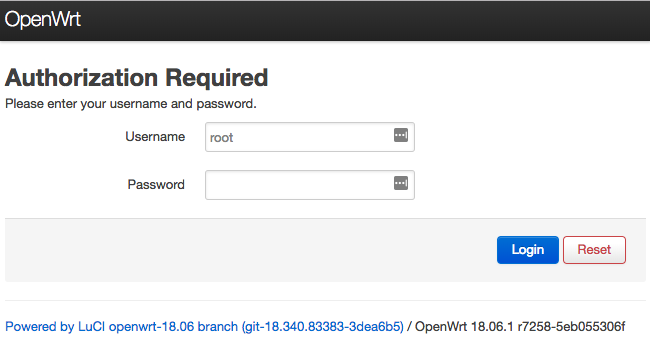
WireGuard VPN Setup on OpenWrt
When connecting a constellation of remote LAN's over a VPN each private LAN network must be unique, so let's do that now.
Network → Interfaces → LAN
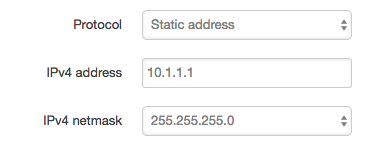
Choose a unique private LAN network for your constellation. Then Click “Save & Apply”

After a few seconds, no reboot needed, the LAN will now be a 10.1.1.0/24 network. If you were connected via a LAN device, you must change to https://10.1.1.1 to return to the OpenWrt web interface.
Generate a WireGuard Keypair
The OpenWrt web interface does not automatically generate a WireGuard keypair, which is good practice for the ER-X system without much entropy. It is better to use the AstLinux endpoint, or perhaps a Linux desktop, to generate the WireGuard keypair.
Paste the following three lines (all at once) into the shell command line anywhere WireGuard is installed…
(wg genkey | tee /tmp/privatekey.tmp | wg pubkey > /tmp/publickey.tmp
echo "Private Key: $(cat /tmp/privatekey.tmp ; rm /tmp/privatekey.tmp)"
echo "Public  Key: $(cat /tmp/publickey.tmp ; rm /tmp/publickey.tmp)")
Example output will be ( don't use these! ):
Private Key: 8EMEcr7xVc5QNACjYSboi391ZYuVPubhEsTfP/AXCVQ=
Public  Key: eWn4K2agIgdmOVIZdUkE4viezPFMW7mfZAckOdRybBY=
Apply the generated keys as follows:
- Use your generated Private Key in the interface Common Configuration below.
- Use your generated Public Key in the remote WireGuard VPN peer AstLinux configuration.
- Use the AstLinux remote WireGuard VPN Public Key in the Peers configurations below.
For this example, the AstLinux remote WireGuard VPN Public Key is:
CXy5NilZgh5t0BqNPbVSXbDHZZvt0e5vFgJ6YqX6XjI=
and the remote WireGuard VPN peer entry for this ER-X/OpenWrt in AstLinux would be:
[Peer]
## ER-X/OpenWrt
PublicKey = eWn4K2agIgdmOVIZdUkE4viezPFMW7mfZAckOdRybBY=
Endpoint = vpn20.example.com:51820
AllowedIPs = 10.4.0.20/32, 10.1.1.0/24
PersistentKeepalive = 25
Tip -> Both Endpoint and PersistentKeepalive could be removed from the peer definition above if the AstLinux endpoint has a static public WAN IP address, thereby the OpenWrt endpoint would initiate and establish the VPN.
Add a WireGuard VPN interface
Network → Interfaces → { Add new interface… }
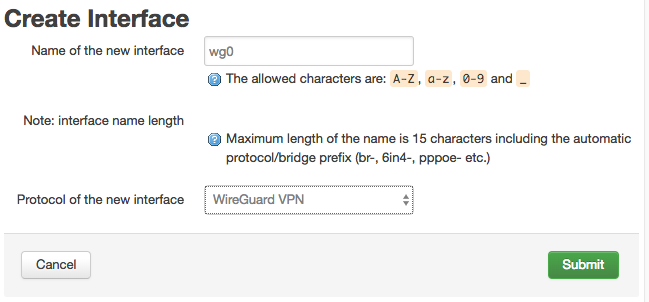
Enter wg0 for the interface name for “WireGuard VPN” protocol. Then Click “Submit”
Configure WireGuard VPN interface
Network → Interfaces → “WG0” → “General Setup”
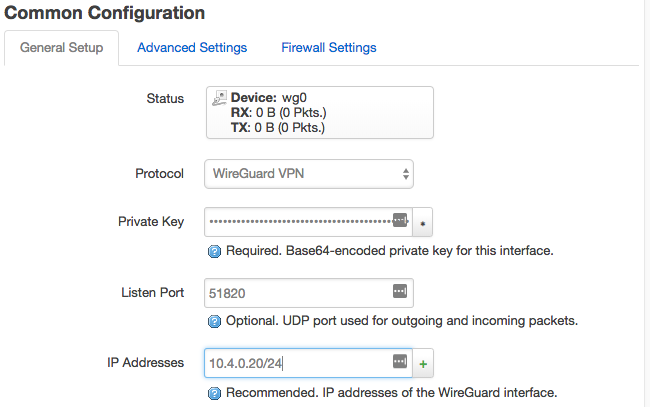
Specify the “Private Key” (generated above) and set the “Listen Port” to 51820.
Choose a unique private WireGuard IPv4 address, within the common WireGuard subnet. Then Click “Save & Apply”
Add a WireGuard VPN peer
Network → Interfaces → “WG0”
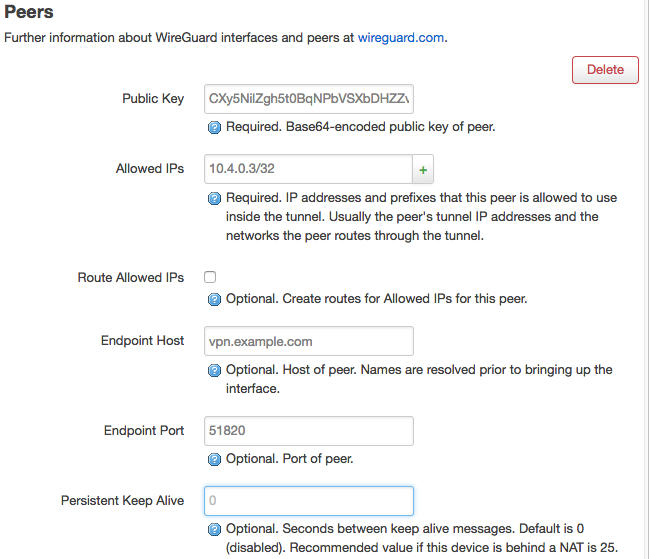
Specify the “Public Key” from the AstLinux remote WireGuard VPN Public Key.
The “Allowed IPs” are what networks are allowed in the tunnel, this simplest case is just the remote AstLinux WireGuard IP address. If you add additional remote networks, you will want to also check “Route Allowed IPs” to automatically generate routes via the tunnel for those networks.
After the peer is defined, “Save & Apply” changes and then restart WireGuard:
Network → Interfaces

WireGuard Firewall Setup on OpenWrt
In order to allow UDP/51820 traffic into OpenWrt, open a firewall port…
Network → Firewall → “Traffic Rules”

Click “Add” and “Save & Apply” changes. The resulting rule is:

Create a “wg” Zone for the WireGuard VPN … Network → Firewall … click “Add” and create results looking like:

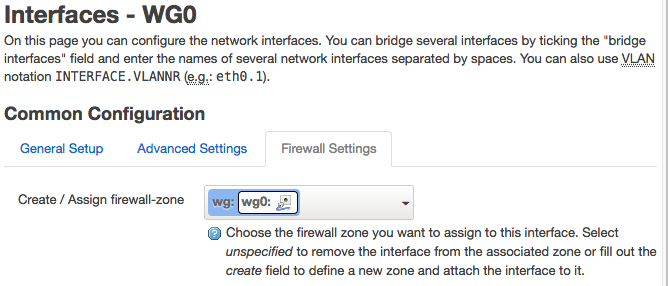
Finally, add the “wg” Zone to the wg0 interface…
Network → Interfaces → “WG0” → “Firewall Settings”
Alternatives to the EdgeRouter X
The EdgeRouter-X is sometimes hard to get. Kind of alternatives are the “travel router” devices from GL.inet as they are already based on OpenWRT (plus an additional GL.inet WebGUI) and already include WireGuard and OpenVPN. But they are using plastic cases. You can also easy switch directly to Luci.
ifconfig eth1:1 192.168.1.2 netmask 255.255.255.0 upto add an additional virtual address to the server